The Loop
A technical design exploration
As a Technical Designer, I excel in prototyping, setting up scalable and modular systems and creating editor tools. I aim to share insights from my career, offering tips and explaining my workflow behind complex technical challenges.
Destiny has been a key reference for developing The Loop. I've studied and replicated systems like automatic pickups, gameplay feel, and weapon functionality in Unreal Engine using C++ and Blueprints, ensuring structured class and system architecture.
Lightweight pick up system
A key part of the core gameplay loop is collecting materials and purchasing suit upgrades. Establishing an optimized and scaleable system early on was a high priority. I studied how Destiny handled automatic pickups, like Glimmer (currency) and ammo. Using collision filtering with an interface I developed my "Lightweight pickup system" for physics objects. Below you can get an overview of the individual components as well as a walkthgough of the system.
System component breakdown
-
Player with sphere collision
-
Collision filtering
-
-
Blueprint interface for communication
-
Passing values without creating hard references
-
-
Loot blueprint and associated data table for individual properties
-
Easy to tweak and balance
-
-
Interactive volume
-
Loot crate with RNG-functionality
Useful information mentioned
in my walkthrough below
Collision filtering:
https://www.unrealengine.com/en-US/blog/collision-filtering
Practical tips for managing collision settings & queries:
Ability System
Implementing Gameplay Ability System together with a custom activation component
System summary and component breakdown
The goal of the upgrade loop is to create an immersive and diegetic system where players interact with physics-based actors to modify their suit, rather than navigating 2D menus. By focusing on class architecture and interconnected systems, including interactions, physics, persistent data and a custom activation component I utilized Unreal's Gameplay Ability System to set up a versitile and engaging upgrade loop.
Below follows a breakdown of the key components for the upgrade system.
Setting up character inheritance
and adding the Ability System Component
After researching different approaches to implementing an ability system, I concluded that Unreal's Gameplay Ability System best suited my planned upgrade loop.
The Ability System Component (ASC) is implemented in C++ within the parent character, allowing all derived characters to utilize it. GAS is declared in the header file, and the ASC is initialized in the constructor.


Physics actors containing abilities for an immersive upgrade loop
Instead of non-diegetic 2D menus for the skill tree, the prototype uses collectible physics actors called Modules. The C++ parent class, Held Object, handles low-level physics simulation, allowing child classes, ranging from decorations to modules, to share the same functionality.
The system is highly scalable, enabling easy customization and the addition of new modules and abilities while supporting non-destructive prototyping.
Sorting abilities by tags
The core upgrade loop involves installing Modules onto the player's suit by manually attaching physics actors, each referencing a unique Gameplay Ability, to the upgrade bench's sockets. These sockets sort abilities by tag, allowing us to track active and passive abilities.
A manager blueprint monitors the transform of Collected, Onboarded and Attached Modules when their state is changed, for enabling saving and loading the game.


Complementary component for tracking abilities
GAS does not inherently track active abilities, so I implemented a custom complementary component to manage activation conditions and HUD communication.
CanActivateAbility - Checks if an ability is currently active based on a populated array and whether enough charges are available to activate a new ability.
OnActivatingAbility - Consumes set charges, triggers regeneration over time, and updates the HUD via a dispatcher.

Blockout of the Suit upgrade compartment in the personal quarters of the player owned spaceship.
Including sockets attached to the suit for installing och removing abilities and monitors displaying explicit information.
Modular and easy to use set pieces and interactions for designer to use
To quickly test maps and gameplay, I focused on streamlining set pieces, designing them for easy setup and versatile use, while minimizing cognitive load for designers.
Using my Interaction System, gameplay elements communicate via interface messages to validated references, avoiding dependencies while tracking the state of connected assets.
The example below showcases the intuitive and efficient workflow for connecting set pieces and interactions.
States and blueprint communication
Interactable assets are divided into two parent classes: Interactive Assets (The Space Elevator), which provide a prompt on overlap, and LookAt Assets (Consoles), which trigger different widgets and events based on the player's traced interaction channel and input. The parent classes handle low-level functionality, while derived classes can be customized for specific needs, such as options for different states (example: Open/Closed/Broken for doors), by taking connected actor states into account.
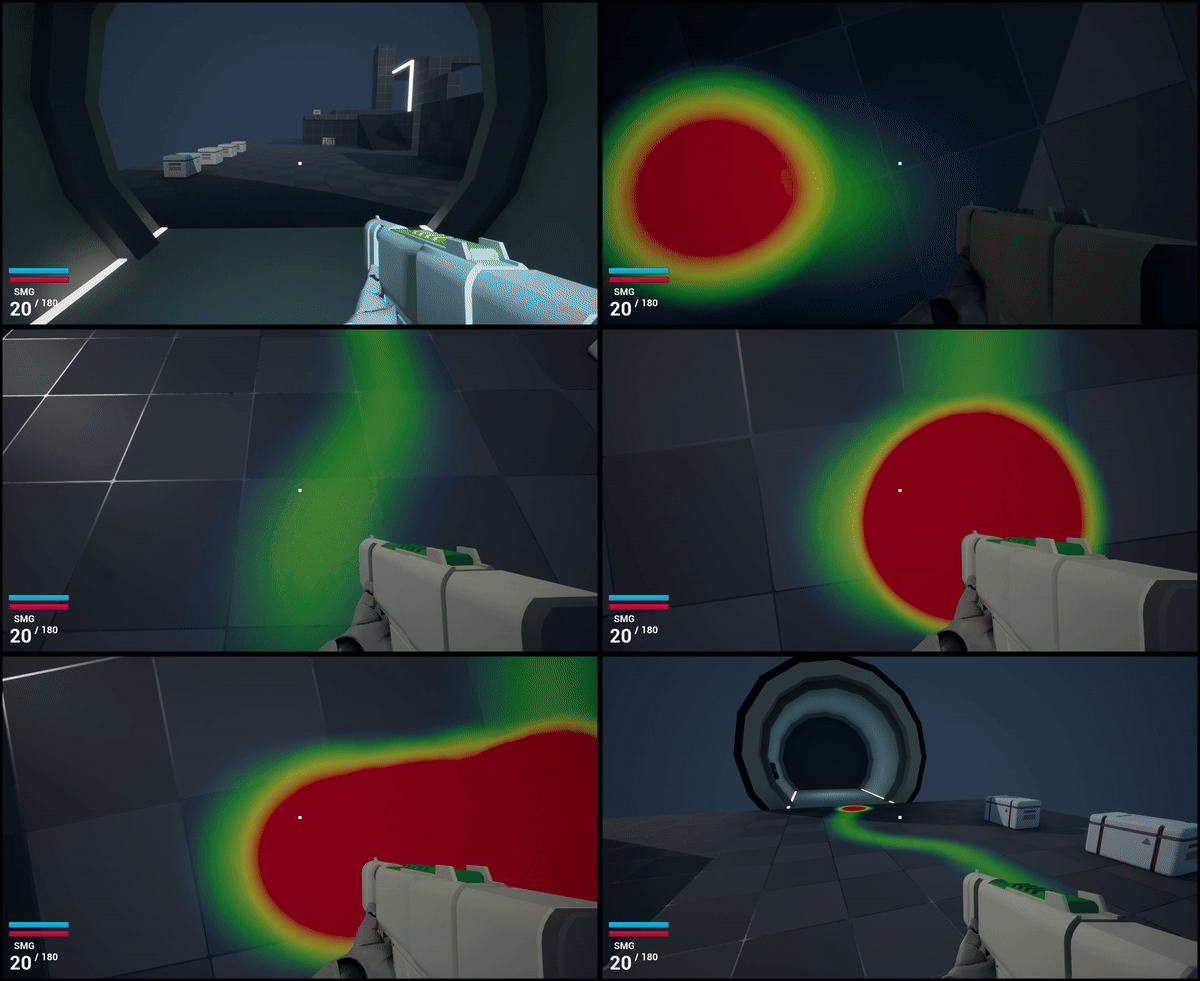
Heatmap tool using Geometry Scripts and Render Targets
Tool features:
-
Using Geometry Scritpting to create a level matching plane
-
Tracks players location with an additive material
-
Draws material to Render Target during runtime
-
A baked Render Target can be exported to disk
-
Size, Strength and Resolution can be changed
-
Renders can be cleared or saved during playtests to analyze player movement and positioning across the testet level

To prepare for playtesting my blocked out levels, I implemented a heatmap tool to track player positioning and decisions, helping identify flaws, flow issues, and combat design problems.
The tool tracks the player's world location using a Multi-Trace for Objects to trace downward, based on a plane generated with Geometry Scripting. The plane can be placed below uneven surfaces, and it ignores the player. The downward trace draws an additive heatmarker material (borrowed from Epic ContentExamples sample project) to the selected Render Target at runtime. On EndPlay the material gets baked to a new Render Target which can be seen in editor as a level overlay or exported to disk in a selected format.
The tool is intuitive to use, designers can drag it into the level, set the plane size to match the test area, and adjust Size, Strength, and Resolution in the Details tab. The Render Target can also be cleared before retesting the level.
Level quick switch manager

I often find the content drawer to obscure my viewport when being used and the option to choose File and/or Ctrl+P and then open level to be unintuitive to use. This lead me to create a Level Manager using an Editor Utility Widget to improve my own workflow when working between levels and gyms. The Level Manager widget is saved to a project specific editor layout which can easily be turned off and on. For scalability, additional options and support for more levels can be added when needed.
Tool features:
-
An option to quickly switch between levels with just a click
-
While instantly saving the one switched from
-
-
An option to create a brand new level from a template
-
This can be done by both writing in a new name or generate an automated one
-
Saves the new one in the correct content folder
-
-
Quickly copy and paste viewport camera
-
To enable going back to the desired location without using a keyboard shortcut
-
-
Disable all ther lighting in a map
The video above showcases the usage of the Level Manager.
The timestamps below exhitbits the following features:
00:00 - Level quick switch, 00:10 - Copy and paste viewport camera, 00:20 - New level from template
Object specific FOV and animation groundwork
To be able to change the FOV is an important addition to every first-person game, both to give the option for players to improve their spatial awareness but also to reduce motion sickness and headaches. When rigging the first person arms and the Blaster I found a sweet spot using an FOV of 75. It gave a good mixture of providing a sense of scale while not obscuring the combat corridor of the viewport.
Using an object specific FOV to compliment the viewmodel and animation has a huge impact and affect how the game plays and feel on a moment to moment basis. Doing these two well helps both playability and replayability.
To support two different FOVs I created a Material Function adjusting the World Position Offset which mimics rendering the viewmodels on top of existing geometry by properly scaling the models vertices accordingly. This function isn't just useful for preventing the weapon from clipping into walls and other meshes but also for keeping the FOV of the viewmodel and weapons consistent when changing the world camera FOV. Utilizing it preserves all animation and poses betwen changes and enables me to work non-destructive.
(Note: This feature will be natively supported in Unreal Engine 5.5).
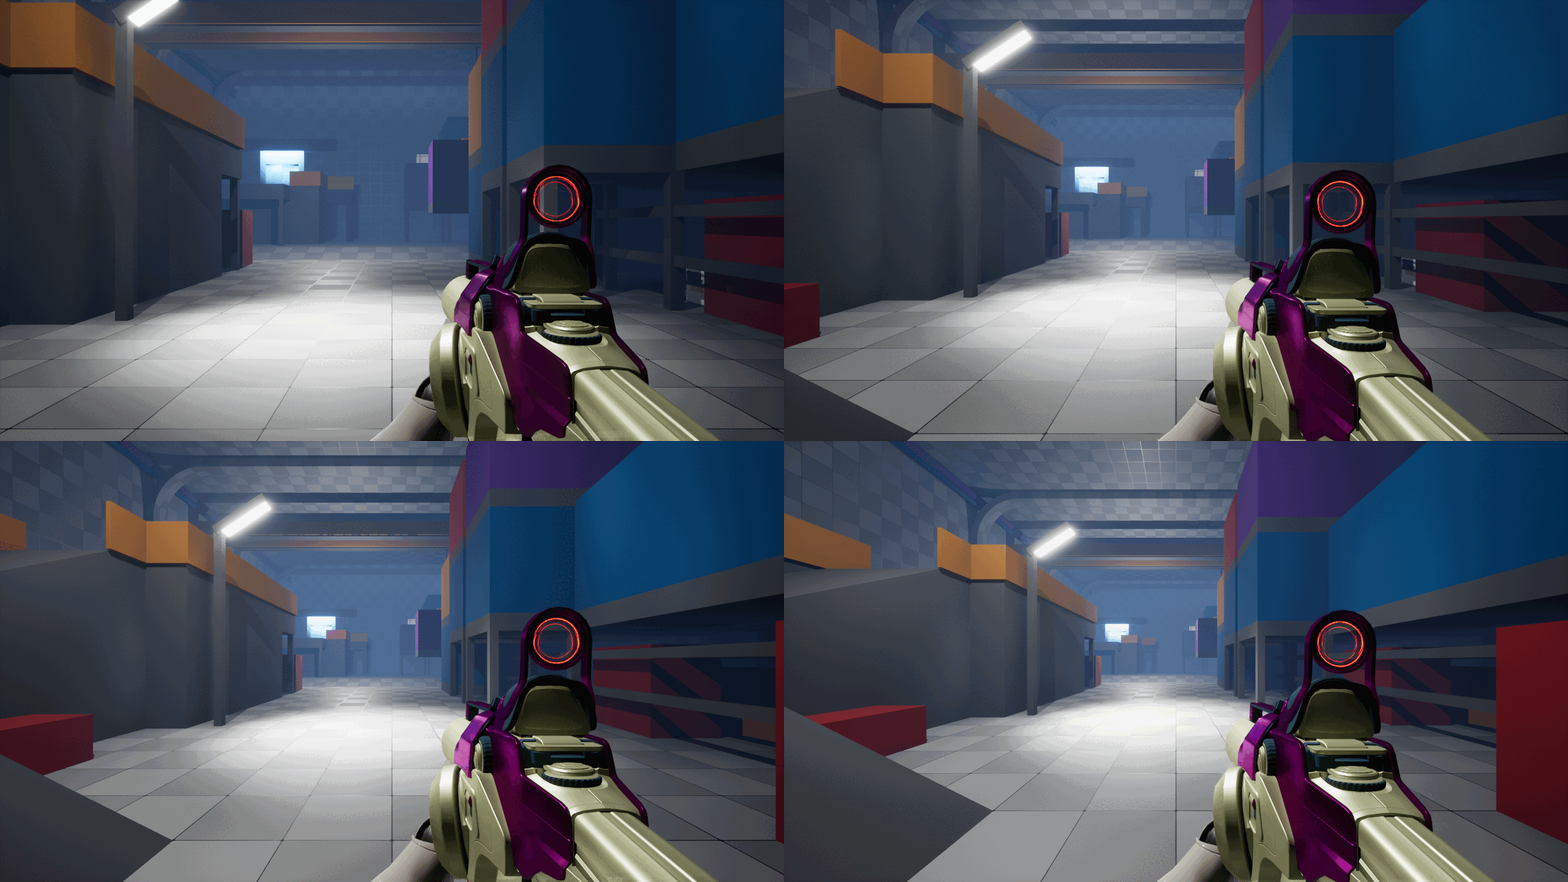
Here you can see the player arms and weapon maintainig the same FOV of 75 that I use when animating in Blender while toggling the world camera FOV between 110, 100, 90 and 75. The system is provides flexibility to test and change FOV between multiple viewmodels and world camera during development. I'm glad I spent time researching the matter and implementing a solid workflow and pipeline for animations so I can stay away from potential pitfalls and having to remake a lot of functionality later on.
In the video below you can see how the function and the parameter called Render Depth adjusting the clip plane distance from the camera and actively prevents the viewmodel from clipping into geometry.

